Search

Wednesday, January 27, 2010

Google Maps in CRM

One way to customize the Microsoft dynamics CRM 4.0 is to use IFrames from within the customization module in the application. This flexible way of extending the functionality of Dynamics CRM 4.0 open endless stream of enhancements that you can add to your CRM application passing dynamic values from /to CRM as parameters to control the IFrame application behaviour.

Blocks of JavaScript code below show how the Geocoding magic is called:
<html>
<head>
<meta name="viewport" content="initial-scale=1.0, user-scalable=no"/>
<meta http-equiv="content-type" content="text/html; charset=UTF-8"/>
<title>Google Maps JavaScript API v3 Example: Geocoding Simple</title>
<script type="text/javascript" src="http://maps.google.com/maps/api/js?sensor=false"></script>
<script type="text/javascript">
    var geocoder;
    var map;
    function initialize() {
        geocoder = new google.maps.Geocoder();
        var latlng = new google.maps.LatLng(-34.397, 150.644);
        var myOptions = {
            zoom: 15,
            center: latlng,
            mapTypeId: google.maps.MapTypeId.ROADMAP
        }
        map = new google.maps.Map(document.getElementById("map_canvas"), myOptions);
    }

    function setGoogleMapDomain(myDiv, domain) {
        var frames = myDiv.getElementsByTagName('iframe');
        if (frames.length > 0) {
            window.frames[frames[0].id].document.domain = domain;
        }
    }

    function codeAddress() {
        var xxx;
        if (document.URL.indexOf('?') == -1)
            xxx = "kuala lumpur, malaysia";
        else
            xxx = document.URL.substring(document.URL.indexOf('?') + 9, document.URL.length);
        xxx = xxx.replace(/%20/gi, ' ');
//        alert(xxx);
        var address = xxx;
        var image = 'new.gif';
        if (geocoder) {
            geocoder.geocode({ 'address': address }, function(results, status) {
                if (status == google.maps.GeocoderStatus.OK) {
                    map.setCenter(results[0].geometry.location);
                    var marker = new google.maps.Marker({
                        map: map,
                        position: results[0].geometry.location,
                        icon: image
                    });
                } else {
                    alert("Geocode was not successful for the following reason: " + status);
                }
            });
        }
    }
</script>
</head>
<body style="margin:0px; padding:0px;" onload="initialize(); codeAddress();">
<div id="map_canvas" style="width:600px; height:400px;"></div>
</body>
</html> 

After that, just right click your .aspx file and view in browser.

Implement into CRM

  1. Create a IFrame in CRM page.
  2. Set the appropriate properties.

You should see Google Maps in CRM like this:


For more information in using Google Maps API, click this.

Enabling the Default Internet Explorer Context Menu (right click)

Sometimes during development (debugging and troubleshooting) of MSCRM applications and customizations, you might want to use internet explorer features like view source and open in new windows. By default, MSCRM disables all internet explorer context menus. If you right click at any MSCRM form, no menu comes unlike other web applications.
In order to enable the context menus, you need to change the Global.js file.

  1. On the Microsoft CRM Web server, navigate to \_common\scripts (typically C:\Inetpub\wwwroot\_common\scripts).
  2. Open and Edit the Global.js file.
  3. Use your text editor’s Find feature to locate the document.oncontextmenu() function.
  4. Comment out the existing code in this function by adding /* and */ as shown in the following code. You can undo this change later by simply removing event.returnValue = true; line and the comment characters.
function document.oncontextmenu()
{
 event.returnValue = true;

 /*
 var s = event.srcElement.tagName;
 (!event.srcElement.disabled &&
 (document.selection.createRange().text.length > 0 ||
    s == “TEXTAREA” ||
 s == “INPUT” && event.srcElement.type == “text”));
 */
}  

Notes :
  1. Backup your Global.js file so that you can restore your changes later on.
  2. Use this technique at development and not at production environment as this unsupported change might cause unpredictable behavior. Microsoft CRM prevents use of the right-click context menu for the user’s benefit and also to maintain a predictable navigation structure in the application interface.

Tuesday, January 26, 2010

Calling CRM Web Service from SQL Server

Past few days ago, someone asked me "Can we call Web Service from SQL Server?"

So, I simply google "call web service from sql server". wOW! It return me many kinds of samples/articles.

I referred one of the samples + doing some research....

ITS WORKS!!

Creating the CRM Web Service

Let’s start with creating our .NET assembly with the custom stored procedure.  Using Visual Studio 2005, create a new Database Project:

So first, we generate the proxy file for our webservice with the wsdl.exe tool in C:\Program Files\Microsoft Visual Studio 8\SDK\v2.0\Bin. We have to convince this tool however, to generate code using the ‘old’ asynchronous way (without the Async methods). Only proxy classes generated that way can be loaded with external access privileges. If we would use the ‘new’ proxy classes, we have to use unsafe as security level, which can better be avoided. We can do this by using a configuration file. First create a configuration file containing the following xml:


1:  <wsdlParameters xmlns='http://microsoft.com/webReference/'>
2:    <language>c#</language>
3:    <protocol>Soap</protocol>
4:    <nologo>true</nologo>
5:    <sharetypes>false</sharetypes>
6:    <webReferenceOptions>
7:      <codeGenerationOptions>properties oldAsync</codeGenerationOptions>
8:    </webReferenceOptions>
9:  </wsdlParameters>

Save this file as c:\oldwsdlconfig.xml (change the language element to VB if you are creating a VB.NET project: vb). Now, call wsdl.exe to generate the proxy class:


This will generate a CrmService.cs  file. We will now add this file to our SQL Server project in Visual Studio by right clicking our project, selecting Add -> Existing items, and then browse to the location where the CrmService.cs  file was created. We will see an error if we build our code this way: the generated proxy class uses the webservice dll, which is not yet referenced, so right click the project in the Solution Explorer, choose add reference, and select System.Web.Services from the list.


Next, we have to avoid that our code will do runtime assembly creation for the serialization and deserialization of the objects which travel across this webservice. In order to do that, we right click in our Solution Explorer on the project and select Properties.

Select the Build tab, and at the bottom select for Generate serialization assembly the value On


While we are in the project property window, we can set the permission level property as well: select the database tab, and set the value for permission level to external. In this way, we mark this assembly as an assembly which is ‘safe’ in the sence that it will not do dangerous thread manipulations, platform invokes, …, and hence it is not marked as unsafe. But it is less safe than an assembly marked ‘safe’, because it makes calls over the network, or reads/writes to the hard disk.


1:  CrmService services = new CrmService();
2:  services = ConnectCrmServiceWithoutImpersonation(services, "username", "password", "domain", "http://servername/mscrmservices/2007/CrmService.asmx", "organization");      
3:  account agent = new account();
4:  agent.name = "Test 123";
5:  agent.new_agentname = "Agent Name";
6:   
7:  services.Create(agent);


1:      public static CrmService ConnectCrmServiceWithoutImpersonation(CrmService oService, String NETWORKUSERNAME, String NETWORKPASSWORD, String NETWORKDOMAIN, String crmServiceUrl, String tokenOrganizationName)
2:      {
3:          try
4:          {
5:   
6:              oService.Credentials = new System.Net.NetworkCredential(NETWORKUSERNAME, NETWORKPASSWORD, NETWORKDOMAIN);
7:              oService.Url = crmServiceUrl;
8:              CrmAuthenticationToken token = new CrmAuthenticationToken();
9:              token.OrganizationName = tokenOrganizationName;
10:              oService.CrmAuthenticationTokenValue = token;
11:              oService.PreAuthenticate = true;
12:   
13:   
14:          }
15:          catch (Exception ex)
16:          {
17:              //TODO: Enterprise Library
18:              throw ex;
19:          }
20:          return oService;
21:      }
Next, we can build and deploy this project.

Building the assembly

Before we build our assembly there are a couple of project settings that need modification.
Here we ask Visual Studio to also generate an assembly containing the XML Serializers.  This is needed because our code is calling a web service and code running in SQL Server is not allowed to use the serializers that are normally generated dynamically.


Another setting that we need to change is the Permission Level.  This is also required because our code is calling a web service, hence external.


Server and Database Settings

Now that we’ve covered the actual development of the stored procedure we would like to install it on our database server.  This requires us to modify some settings on the server and database.  If you are not the DBA of the server and you are in the luxurious situation that such a person exists, please verify with him/her if you are allowed to modify these settings.

Enabling CLR Integration

By default SQL Server does not allow CLR Integration.  This setting can be easily modified with the following script:
exec sp_configure 'clr enabled', '1';
reconfigure;

Our database we trust

As our stored procedure needs external access permission, we need to create the assembly with external access (as shown in next chapter).  To get this to work we need to convince SQL Server that our database can be trusted: (I’ve used AdventureWorks in this article but this can be any existing database)
ALTER DATABASE AdventureWorks
SET TRUSTWORTHY ON;

Installing the Stored Procedure

We’re almost there, all that remains to be done is to tell SQL Server where our stored procedure can be found and that it actually exists.  Assemblies, just like stored procedures, live in a database (AdventureWorks in our case).  In Management Studio you can see your assemblies in the Object explorer under the Programmability node of your database:
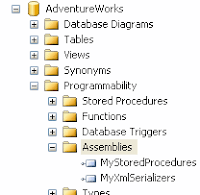
\


Adding the assemblies

Following script adds the two assemblies that we’ve created earlier to your database.  An assembly is given a name, like MyStoredProcedures.  Here you can finally see the EXTERNAL_ACCESS permission that we need for our web service call.
CREATE ASSEMBLY MyStoredProcedures
FROM 'D:\MyStoredProcedures.dll'
WITH PERMISSION_SET = EXTERNAL_ACCESS;
GO
CREATE ASSEMBLY MyXmlSerializers
FROM 'D:\MyStoredProcedures.XmlSerializers.dll'
WITH PERMISSION_SET = EXTERNAL_ACCESS;
GO

Adding our stored procedure

Last step is to create our stored procedure.  We tell SQL Server that it can be found in the MyStoredProcedures assembly, in the class StoredProcedures and that the method is called WeatherSP.  We have one parameter of type string in our method definition, which translates to nvarchar in the stored procedure.  A length of 10 is more than enough for our ZIP code.
CREATE PROCEDURE WeatherSP
AS EXTERNAL NAME MyStoredProcedures.StoredProcedures.WeatherSP;
GO

Execute the stored procedure to run the web service
EXEC [dbo].WeatherSP
 

Drawbacks

Some drawbacks of calling CRM Web Service from SQL Server:
  1. To get updated CrmService web service in code file .cs/.vb, we must recompile/regenerate the CrmService web service .asmx whenever changes done at CRM server, such as adding entities/fields.
  2. Increase of resources usage(calling stored procedure -> crm service). It may slow down the system performance.

Thursday, January 21, 2010

SQL Server Trigger to Send E-mail

First, if SQL Mail isn't enabled and a profile hasn't been created, we must do so.

   1:  --// First, enable SQL SMail
   2:  use master
   3:  go
   4:  sp_configure 'show advanced options',1
   5:  go
   6:  reconfigure with override
   7:  go
   8:  sp_configure 'Database Mail XPs',1
   9:  go
  10:  reconfigure
  11:  go
  12:   
  13:  --//Now create the mail profile. CHANGE @email_address,@display_name and @mailserver_name VALUES to support your environment
  14:  EXECUTE msdb.dbo.sysmail_add_account_sp
  15:  @account_name = 'DBMailAccount',
  16:  @email_address = 'sqlserver@domain.com',
  17:  @display_name = 'SQL Server Mailer',
  18:  @mailserver_name = 'exchangeServer'
  19:   
  20:  EXECUTE msdb.dbo.sysmail_add_profile_sp
  21:  @profile_name = 'DBMailProfile'
  22:   
  23:  EXECUTE msdb.dbo.sysmail_add_profileaccount_sp
  24:  @profile_name = 'DBMailProfile',
  25:  @account_name = 'DBMailAccount',
  26:  @sequence_number = 1 ;


Now that SQL will support sending e-mails, let's create the sample table. This is not a useful or well designed table by any means -- it's just a simple example table:

   1:  CREATE TABLE dbo.inventory (
   2:  item varchar(50),
   3:  price money
   4:  )
   5:  GO
Now that SQL mail and the table are setup, we will create a trigger that does the following:
  1. Creates an AFTER INSERT trigger named expensiveInventoryMailer on the inventory table. This means that the trigger will be executed after the data has been entered.
  2. Checks for items being entered that have a price of $1000 or more
  3. If there is a match, an email is sent using the SQL Mail profile we used above.
   1:  CREATE TRIGGER expensiveInventoryMailer ON dbo.inventory AFTER INSERT AS
   2:   
   3:  DECLARE @price money
   4:  DECLARE @item varchar(50)
   5:   
   6:  SET @price  = (SELECT price FROM inserted)
   7:  SET @item = (SELECT item FROM inserted)
   8:   
   9:  IF @price >= 1000
  10:  BEGIN
  11:  DECLARE @msg varchar(500)
  12:  SET @msg = 'Expensive item "' + @item + '" entered into inventory at $' + CAST(@price as varchar(10)) + '.'
  13:  --// CHANGE THE VALUE FOR @recipients
  14:  EXEC msdb.dbo.sp_send_dbmail @recipients=N'manager@domain.com', @body= @msg,  @subject = 'SQL Server Trigger Mail', @profile_name = 'DBMailProfile'
  15:  END
  16:  GO


The only way to test a trigger is to add actual data, so let's do that here:

insert into inventory (item,price) values ('Vase',100)
insert into inventory (item,price) values ('Oven',1000)


Your email should arrive very quickly.
If it doesn't, check the SQL Server mail log in SQL Management Studio by running

SELECT 'sysmail_sentitems' as TableName, * FROM msdb.dbo.sysmail_sentitems

SELECT 'sysmail_faileditems' as TableName, * FROM msdb.dbo.sysmail_faileditems

SELECT 'sysmail_allitems' as TableName, * FROM msdb.dbo.sysmail_allitems

SELECT 'sysmail_unsentitems' as TableName, * FROM msdb.dbo.sysmail_unsentitems

SELECT 'sysmail_mailattachments' as TableName, * FROM msdb.dbo.sysmail_mailattachments

Notes:
  1. We can find the triggered values by selecting from trigger table. Eg. (SELECT price FROM inserted)
  2. Trigger only applicable for INSERTED and DELETED.
  3. For UPDATED, use this

   1:  create TRIGGER expensiveInventoryMailer ON dbo.a_inventory after UPDATE AS
   2:   
   3:  if (update (price) or update (item))
   4:  BEGIN
   5:  --Your works here
   6:  END

Default multi column sorting

Being able to sort by multiple columns in CRM is quite handy, but unfortunately there are no mechanisms for configuring a default multi-column sort. Until now. The following code will illustrate how to accomplish it:

For grid in main form(public view/associated view in main form)
var stageFrame = document.getElementsByName("stage")[0]; 
var stageFrameDoc = stageFrame.contentWindow.document; 

crmGrid = stageFrameDoc.all.crmGrid; 
crmGrid.all.divGridProps.children["sortColumns"].value = "fieldname:0;fieldname:1"; 
crmGrid.Refresh();

For grid in left nav(public view/associated view)
GetIframe("new_incident_new_entityname");

function GetIframe(loadAreaId) {
    var isNativeEntity = false;
    var navElement = document.getElementById('nav_' + loadAreaId);
    if (navElement == null) {
        navElement = document.getElementById('nav' + loadAreaId);
        isNativeEntity = true;
    }

    if (navElement != null) {
        navElement.onclick = function LoadAreaOverride() {
            // Call the original CRM method to launch the navigation link and create area iFrame 
            if (isNativeEntity) {
                loadArea('area' + loadAreaId);
                Iframe = document.getElementById('area' + loadAreaId + 'Frame');
                //put code to get gridobject here (grid from main form)
            }
            else {
                loadArea(loadAreaId);
                Iframe = document.getElementById(loadAreaId + 'Frame');
                //put code to get gridobject here (grid from left nav)

                function IframeReady() {
                    if (Iframe.readyState != 'complete') {
                        return;
                    }
                    var stageFrameDoc = Iframe.contentWindow.document;
                    crmGrid = stageFrameDoc.all.crmGrid;
                    crmGrid.all.divGridProps.children["sortColumns"].value = "fieldname>:0;fieldname>:0";
                    crmGrid.Refresh();
                }

                Iframe.onreadystatechange = IframeReady;
            }
        }
    }
}

Notes:
  1. Change the value for the "sortColumns" property to ":[; :]" where: is the name of the sorted column is 1 (descending) or 0 (ascending).
  2. Repeat the bracketed block as necessary, being sure to place a semicolon (;) between each field/sort pair.
There must be NO SPACES. Finally, call a Refresh() on the grid. The downside to this code, is that it does not update the sorting icon on the columns. There's a call being made somewhere, and I think it has to do with analyzing the keypress+click event, that updates the image... whereas my code does not follow that code path.


    Tuesday, January 19, 2010

    Get CRM Webservice Soap Exception in detail

    This sample to helps to give you a bit more information when you hit a Soap Error when connecting to the CRM Web services.

    I think its a great way to bubble up that bit more information about what caused the error to the developer (and any error logging you may be doing as well) & help you work out what has happened, so thought I would share it:


       1:  try
       2:  {
       3:   
       4:      //do something here that tries to use the CRM Webservice
       5:   
       6:  }
       7:   
       8:  catch (SoapException ex)
       9:  {
      10:   
      11:      string errorMessage = ex.Message;
      12:   
      13:      if (ex.Detail != null)
      14:      {
      15:   
      16:          // If there is a InnerText message then we will overwrite with this instead. It can be
      17:   
      18:          // more helpful to explain the error.
      19:   
      20:          errorMessage = ((System.Xml.XmlElement)ex.Detail).InnerText;
      21:   
      22:      }
      23:   
      24:      throw new Exception("Something went wrong when communication with the Web Service. Error: " + errorMessage);
      25:   
      26:  }

    Friday, January 15, 2010

    1st Day of blogging

    wow.. it's my 1st day blogging here..
    Googled around to find out how to insert code snippet into the blog..
    Here's the workaround:

    1.In the blogger,Click on Layout tab ->Edit HTML and put following things Before </head>

    <link href='http://syntaxhighlighter.googlecode.com/svn/trunk/Styles/SyntaxHighlighter.css' rel='stylesheet' type='text/css'/>
    <script language='javascript' src='http://syntaxhighlighter.googlecode.com/svn/trunk/Scripts/shCore.js'/>
    <script language='javascript' src='http://syntaxhighlighter.googlecode.com/svn/trunk/Scripts/shBrushCpp.js'/>

    2. put following things Before </body>

    <script language="javascript">
    dp.SyntaxHighlighter.BloggerMode();
    dp.SyntaxHighlighter.HighlightAll('code');
    </script>


    3. encode (HTML Encode) your source code. for this, you can use this.

    OR

    Copy your code in notepad and replace all < in &lt; etc.

    4. Put your updated code between:
    <pre name="code" class="Cpp">
    //Put your code here
    </pre>

    Result as below:


    function Abc() {

    }